Wednesday, February 26, 2014

live edge trestle table part 14

the saga finally ends!


my friend daniels came over and saw the famous desk i had been talking about for well over a year. his initial reaction was to hug it.


it took me 90 minutes to clear out the old desk. my desk space is home to 5 speakers, two rack-mount audio components, two computers, two monitors, external hard drives, phone (land line), headset, modem, router, computer accessories, and more.


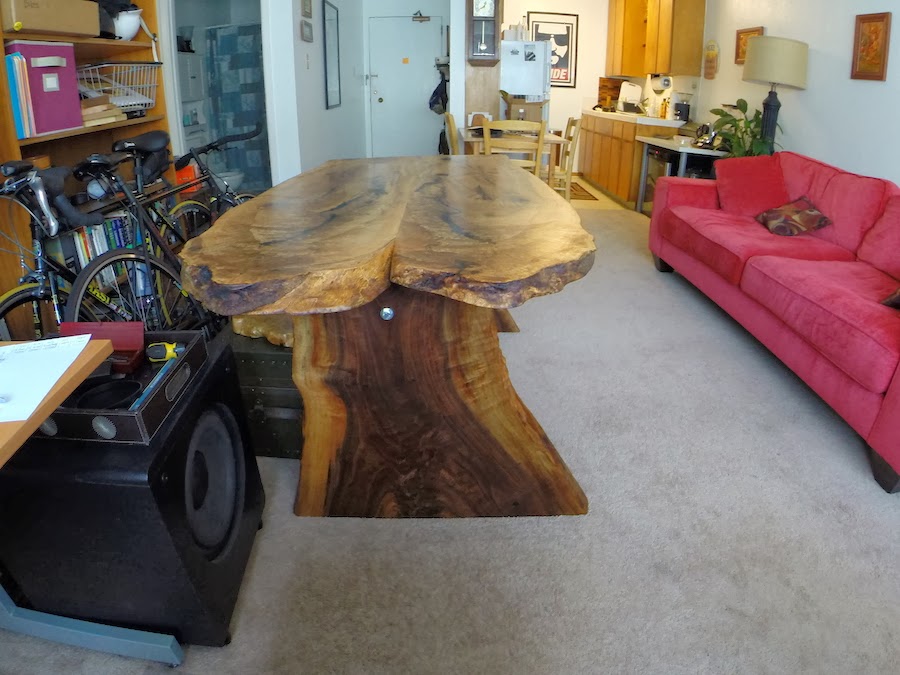
if life was simpler, this is what my desk would look like.


my place isn't huge, thus the big speaker to my left. but hey, i like speakers.


you may be able to tell that some of my pictures are clear and beautiful while others are a bit grainy and full of noise. that's because the nice pics are compliments of my new gopro hero3+, and the grainy pics are my iphone 4s. i captured these pics in the morning with just the right amount of 10am sunlight.


i have no problem hearing my music.


the desk is nice and deep. i can rest my elbows on it while i type, which is what i prefer. i can push the keyboard, mouse, and trackpad away from me and have plenty of room for good old pencil and paper.


the two pictures below are my favorite, i couldn't decide which one captured the entire setup better so i included them both


and here we have the credenza alongside the trestle table. it feels amazing to have two pieces in my house that i built with my dad. i built these suckers to last, so hopefully they will be in my family for generations. but for now i'll be using them to write more blog posts and listen to music while doing so.


overall i spent about $750 in materials and the project took about 120 hours of labor. this doesn't include plane tickets or gas, cause i'd be visiting my parents regardless of whether i'm building a table. so what's next?

Tuesday, February 25, 2014

live edge trestle table part 13

my parents are awesome. they packed up the truck and drove 500 miles to drop off the table, then they drove 500 more just to go home. if you didn't sing that last sentence then you are missing out on a pretty nerdy song.


the table made it safely to san francisco, here's the legs and stretcher upon arrival.


the table top leaned up against the wall, just waiting to be resting on some walnut crotchwood legs.


the stretcher hanging out with hardware holes showing.


since we finished this about a month and a half ago, the finish had cured fully and was nice and hard. this means it was ready to get waxed. my choice of wax is howard's feed-n-wax. this stuff smells good and gives a great texture to the wood. usually people look at wood pieces with their hands, this is what they are really touching. i apply with a "0000" steel wool, then wipe off with a clean rag after about 10 mins.


getting ready to assemble! i needed help so i recruited the girlfriend. she is preparing to help lift the table top onto the assembled base.


base with no top


base with top


because this project spanned well over a year, i felt the need to take more pictures than necessary. in fact my iphoto album has nearly 700 pictures dedicated to this table. here's a few.


i just love how rich the legs and top came out, there's something magical and mesmerizing in that beautiful grain pattern.


if that wasn't enough pictures of the final project, my next entry will have pictures of the desk where it was meant to be, with a computer and speakers on it.


Friday, February 21, 2014

live edge trestle table part 12

And now folks, the moment that I've been waiting for... The finishing! I sanded this table top first at 80grit with the belt sander, then 120 then 180, then 220, then 320, then 400, and finally 600 grit!! Let me say now that this table top is smoother than a baby's butt.


Here's a shot of a crack and the swimming pool, these should blend in far more once the finish is applied.


Another epoxy filed crack close up, as you run your fingers over it with your eyes closed you can't tell where the wood stops and the epoxy starts.


I'm proud at how the joint came out, again it's hard and easy to see but impossible to detect upon touch. I guarantee you can't keep your hands off of parts like this in the table top.


In order to attach the table top to the legs I cut a few pieces of walnut and attached them to the top of the leg using screws. The screws were counter sunk and then covered with a walnut plug.


Closer pic of the holes where the hardware holds everything together.


Here's that piece with finish applied. HOLY SMOKES does it look amazing. These walnut crotches are so beautiful with light sand colored sapwood transitioning to deep browns and purples in the middle.


the stretcher looks amazing as well, with that big knot looking at you like the eye from Lord of the Rings!


The bottom of the table top has grooves routed for where the table top meets the legs.


And here's the finished table top. the colors of this black oak are simply beautiful, and all of those cracks and knots add so much character to the piece. All of the epoxy work seems to have paid off.


link to part 13

Wednesday, February 19, 2014

live edge trestle table part 11

Before doing anything permanent, we dry clamp. Basically this is just fitting things together in order to verify that our calculations are correct. Notice how I'm making sure everything fits perfectly before I whip out the drill.


It's amazing when things start to come together. Usually the idea in my mind is foggy at best, but once things physically come together and my vision is realized it's like witnessing magic.


The table top has had countless hours of epoxy pouring, sanding, more sanding, more epoxy pouring, and then sanding again. I went over the bottom of the table top with rough sand paper and the sides of the table with a wire brush.  This picture shows the table top after being wiped with a wet rag. Some parts of the table are already starting to dry up, but this is close to what the table will look like with finish applied.


I'm ready for my closeup!


Then we threw the table top on the legs to see how it'll look.


Gotta get that top level.


When everything looks good, I installed the hardware that'll hold the legs and stretcher together. These bolts are heavy duty and cost $10 each! But they are quality, and I love how they look. The bolt goes through the leg and into the stretcher, where a brass cylinder with threads receives the bolt and pulls both pieces together nice and snug.


This is the back, with that nice piece of brass showing. These two pieces ain't going anywhere, but can be easily taken apart for moving. The best of both worlds.


link to part 12