this past weekend i went to las vegas with some friends, and i lost my iphone. The phone wasn't even 1 yr old, and i lost it by leaving it in a private cabana at the pool. quite the pathetic way to lose a phone i know. but i left without it and never saw it again.
losing a phone is stressful, regretful, embarrassing, disheartening, and plenty of other negative feelings rolled into one. this is especially true when the phone you lost is apple's most recent model iphone. to replace what i lost it would cost me $750. waiting over a year for my contract to expire so that i can re-sign a contract and buy a new iphone at the subsidized price of $299 is also rather painstaking.
but i've already complained these woes to anyone who will listen to me vent. close friends have offered condolences and shared with me times that they lost or destroyed their phones. it happens. one fried tried to brighten my day by telling me that he was just pooped on. but seeing my friends dragged down didn't lift my spirits this time.
what i have realized these past few days is how redundant my phone has become, without me knowing it. i own a mac mini desktop, a macbook notebook, and an ipad. i can send imessages to the 99% of my friends who own ios devices from my computer and ipad -so no real loss of text messages. i can use facetime or skype to talk with my girlfriend at night. i can even keep up with all of my ios games via my ipad.
surprisingly my online life hasn't really seen a hiccup due to the loss of my phone. the biggest loss for me so far is the upcoming hit to my bank account.
granted, i did feel a bit of phone loss while in transit from vegas to san francisco. the first thing i do when i have an idle 30 seconds is pull out my iphone and stare at it. checking twitter, facebook, some of the games i play, etc. i wasn't able to do that between the cab, airport, and bart ride home from vegas, and that's when i missed the phone the most. however, i did what i used to do pre-iphone days. i people watched! it was pretty refreshing and fun for a while.
now i'm sure that when the weekend comes, or when i actually leave my house i will be missing the ability to look up directions. will i have to start printing mapquest? i'll also miss the ability to text message people while on the go. sure i can send messages now, but that only works while i'm at home on my wifi network. what happens when i'm planning to meet a friend at some pre-determined location, things change so suddenly these days, we always say "text me when you get there" or something of the like. i don't have that ability right now so i could end up eating dinner alone.
in all it isn't so bad. and makes me wonder if having an iphone is worth it for me since i have an ipad? the two devices sync virtually everything anyhow. how would my life be using a phone that only does talk/text?
i am going to use mom's old blackberry for now, as there are a billion rumors published daily about the next greatest apple phone being released, so it makes sense for me to wait and see what happens with that before i take any action.
(the tiger pic up top was the image i used for my iphone lock screen wallpaper)
Tuesday, August 21, 2012
Thursday, August 9, 2012
that's sharp
since i can remember i've had a fascination with knifes. i willingly joined cub scouts when i was in elementary school solely because i was promised that i'd be able to carry a knife. this was mom's way of teaching me knife safety. for a while, anytime i traveled somewhere i'd buy a knife as my souvenir. it's too bad i didn't keep that tradition, as my knife collection today would be vast and interesting to say the least.
so recently i've been learning how to sharpen knifes, like really sharpen them. i purchased an edge pro knock off and a sided strop block. the edge pro knock off comes with 4 stones of grit 180, 400, 800, and 1500. here's my setup.
i was able to use these tools to sharpen my current set of kitchen knifes, which were very well cared for and still had a decent edge on them. i wanted to challenge myself, could i put a sharp edge on any blade?
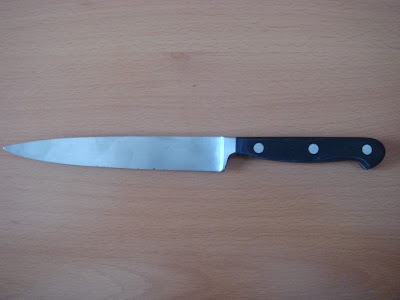
i found this hoffritz knife for sale at a local garage sale: $1 there were chips the size of the grand canyon, but i figured that if i completely screw up this knife then i have only lost the time that i've put into it.
this is after about an hour of grinding with the roughest stone. you can see that there's somewhat of an edge coming into vision, but those chips are still very prominent.
here is a close up via 10x magnification of the edge. there are some burrs on the edge, but you can see that i've practically carved a new edge on the blade.
the tip was also somewhat missing, so i took the stone to it in order get finer tip.
and after about 3 hours of stones, and 1 hour of strop i had a finished piece. look at that beautiful edge.
since i had to hog off so much material, the blade isn't 100% straight, from this angle you can see the slight wave. this doesn't affect anything, and will probably only be noticed by me.
the blade is very thin and flexible. i'm not putting much force on this at all.
so how sharp is it you ask? sharp enough to shave the hairs off of my left thumb digit that's how sharp! i left one hair for good measure.
here's my right thumb for reference of how much hair i shaved.
i'm still a novice behind the stones and strop, but learning is what i enjoy so having plenty to learn pleases me.
Labels:
diy
Wednesday, August 1, 2012
the credenza part 10 - project complete
the next day we were rested, caffeinated, and ready to finish this thing up. this entry is by far the most pictures, with lots of shots showing off how beautiful this piece has come together. the finish is fantastic, and the two woods work so well together along with the granite top.
we got right to it, hanging shelves was step number one. these strips of wood are screwed into the side of the ply walls.
hanging shelves is no easy feat, i wanted to have specific measurements between shelves. dad got caught picking his ear while i fiddled around with ideas of how to make sure that the shelves were level and to the right dimensions.
here's the bottom shelf hung. this shelf sits pretty flush with the bottom horizontal brace, just as i expected. i love the look of the lightly colored sapwood.
notice the hole in the shelf used for threading wires to the back. i always appreciate a good wiring job.
the second shelf is dropped in. thanks mom for taking a few pics while we worked.
the third shelf hung. the distance between shelves turned out not to be exactly what i wanted, but will work well anyhow. again, woodworking is improvising, so we had to improvise on exact design distances.
securing the top to the base was rather simple since we had all mounting points drilled and attached. we set the top on the base, drilled a few pilot holes, and screwed it in.
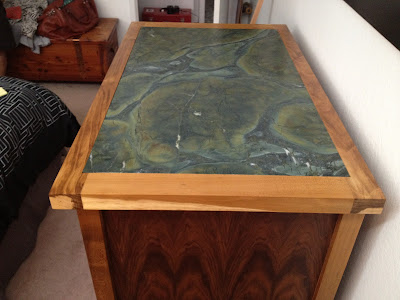
the granite fits like a glove! before we put the granite on, i weighed it with my bathroom scale. 65 lbs! i also weighed a single shelf, which clocked 15 lbs. then we roughly calculated that the entire credenza is about 200 lbs!!!!
and lastly, we put the doors back on. the hinges allow the doors to be easily removed and attached so this step took seconds. the hinges are also soft close, so there's no slamming of doors happening.
this is one solid piece of furniture. as we were putting this together dad was telling me that it would function as a bar pretty darn well. modifying the middle shelf to pull out even is an option down the road. who knows?! the only things i do know are that this is one heavy piece, and i'll be owning it for a long time.
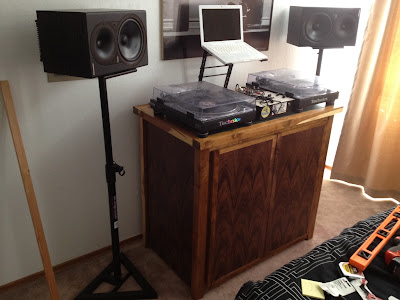
the last step was to setup all of my dj gear. finally i get a look and feel of my ttt (turntable table).
i couldn't be happer with my credenza project. just look at how beautiful the wood is when the sun hits it.
i used a nifty iphone app to take this panoramic picture, showing the room and how the credenza fits in its current space.
i had a fantastic time from start to finish with this project. i can't thank my parents enough. dad and i spent hours talking, working, sweating, and having the time of our lives. mom put up with us talking about it to no end, finished every single piece, and helped with the odds and ends that dad and i needed (like dropping off the granite to get cut). and of course, they both took a short vacation to drive it over 500 miles so that i could have it in my home.
the credenza has a very high value for all of these reasons, but the time spent with my parents during this project is priceless and irreplaceable.


